To access the Wishlist settings page, you can navigate to WooCommerce > Settings > Wishlist in your WordPress admin dashboard. There are some appearance-related settings can also be found in Appearance > Customize > WooCommerce > Wishlist.
Table of Contents
The Wishlist settings page is organized into three main sections: General, Wishlist Buttons, and Wishlist Page. Below is a brief overview of each section:
General
The General section allows you to configure the basic functionality of the wishlist.
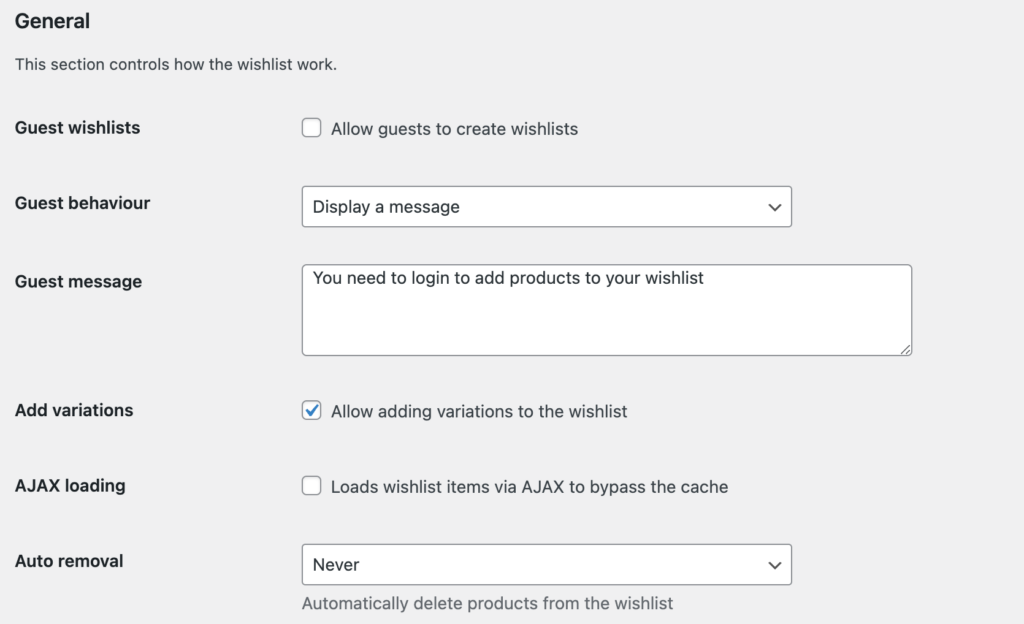
Here are the settings available in this section:
Enable/disable wishlists for guests
This feature enhances the shopping experience for visitors who haven’t yet created an account, encouraging them to engage with your products and potentially register for an account. You can customize the behavior for guests, either redirecting them to the My Account page or displaying a message to prompt account registration.
- Guest wishlists: Toggle this setting to enable or disable the wishlist feature for non-logged-in users.
- Guest Behavior: If the wishlist feature for guests is disabled, you can set the default behavior for guests with this option. It offers two options:
- Redirect to the My Account page: This will redirect guests to the login or registration page.
- Display a message: This will show a message to guests encouraging them to register an account. You can set the message with the settings Guest Message below.
Adding variations to wishlist
This setting allows you to add product variations to the wishlist instead of only adding the parent product (variable product type). Enable this setting to allow users to add specific variations to their wishlist.
Support caching plugins
You can enable the setting Ajax Loading to load wishlist components via AJAX requests. This can be helpful if your website is heavily cached. By default, the plugin is optimized to work well with most caching systems, but enabling this setting can improve performance on highly cached sites.
Auto-remove products from wishlists
The Auto Removal setting helps keep user wishlists organized by automatically removing products once certain actions are taken. There are three options available:
- Never: This is the default setting, which keeps the product in the wishlist.
- On added to cart: Automatically removes the product from the wishlist when it is successfully added to the cart.
- On checkout: Removes the product from the wishlist when it is successfully purchased during checkout.
Wishlist Buttons
In the Wishlist Buttons section, you can customize the appearance and behavior of the wishlist buttons on your product pages.
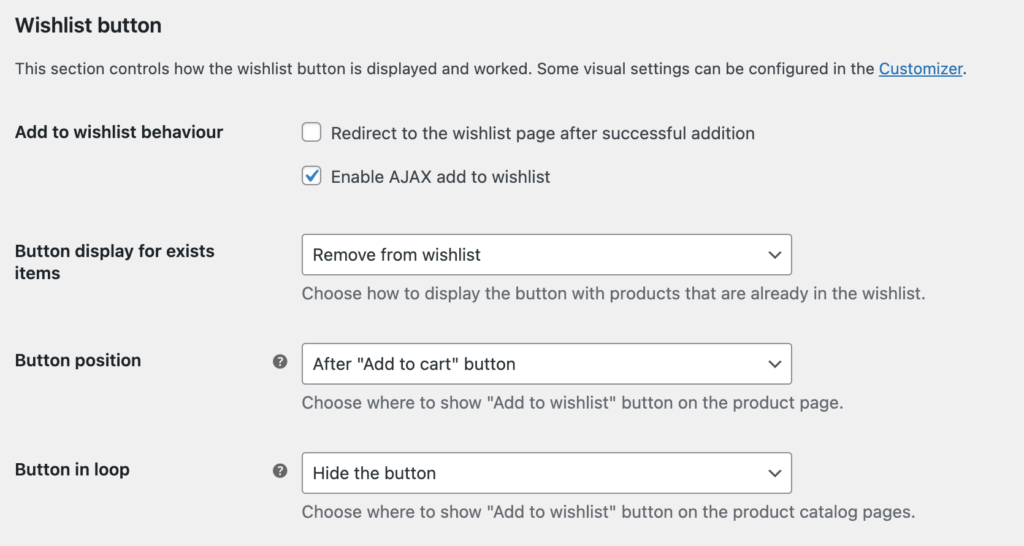
Add to Wishlist Behavior
In this section, you can customize how the wishlist behaves when a customer adds a product:
- Redirect to Wishlist Page: Enable or disable redirecting customers to the wishlist page after successfully adding a product.
- AJAX Add to Wishlist: Enable or disable adding products to the wishlist without refreshing the page.
Button Display for Existing Items
Choose how the wishlist button appears for products that are already in a customer’s wishlist:
- Hide Button: The button won’t appear for items already in the wishlist.
- Show “View Wishlist” Button: Display a “View Wishlist” button for added items.
- Show “Remove from Wishlist” Button: Display a “Remove from Wishlist” button for added items.
Button Position on Single Product Page
Select where the “Add to Wishlist” button appears on individual product pages. You can choose positions like:
- Before “Add to Cart” button
- After “Add to Cart” button
- After product name
- After product short description
- Use shortcode (for custom positioning)
Button in Product Loop
Decide where to display the “Add to Wishlist” button on product catalog pages (like the Shop page, category pages, etc.). Options might include:
- Before “Add to Cart” button
- After “Add to Cart” button
- After product title
- Use shortcode (for custom positioning)
Additional Appearance Settings
For more detailed visual customization of your Wishlist Button, you can access additional settings in Appearance > Customize > WooCommerce > Wishlist Button.
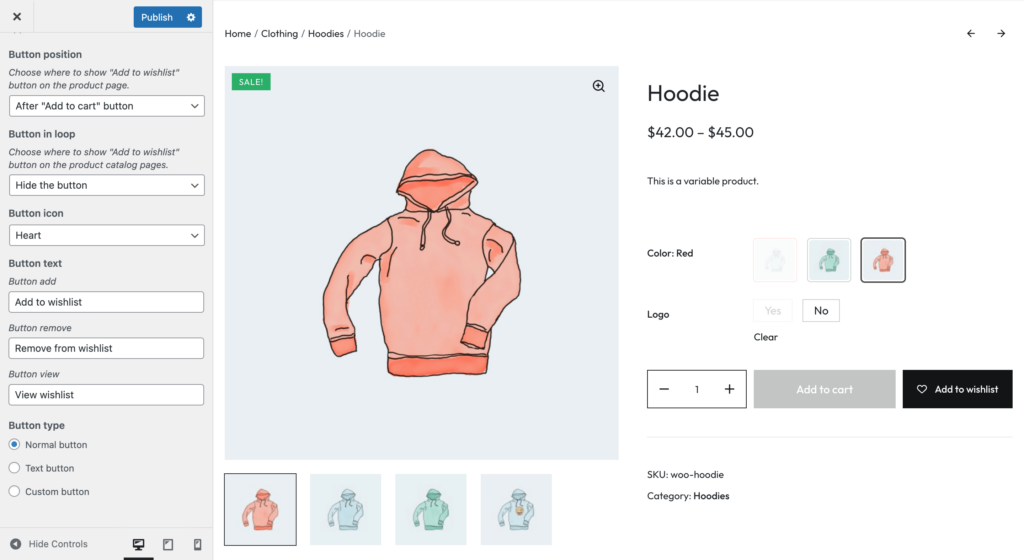
In this section, you’ll find the following customization settings:
Button Position
Similar to the setting in WooCommerce Settings, you can choose where the “Add to Wishlist” button appears on individual product pages.
Button in Loop
Again, similar to the WooCommerce Settings, you can decide where to display the “Add to Wishlist” button on product catalog pages.
Button Icon
Customize the icon displayed on the Wishlist Button:
- Select from pre-defined icon options
- Upload a custom icon to match your store’s style
Button Text
Personalize the text displayed on the button for different states:
- Add button: Customize the text for adding an item to the wishlist
- View button: Set the text for viewing the wishlist (for items already added)
- Remove button: Choose the text for removing an item from the wishlist
Button Style
Fine-tune the visual appearance of your Wishlist Button:
- Select from different button styles
- Customize colors to match your store’s theme
Wishlist Page
The Wishlist Page section lets you customize the layout and features of the Wishlist page itself. You can choose which columns to display, and set up additional features like product sorting and filtering.
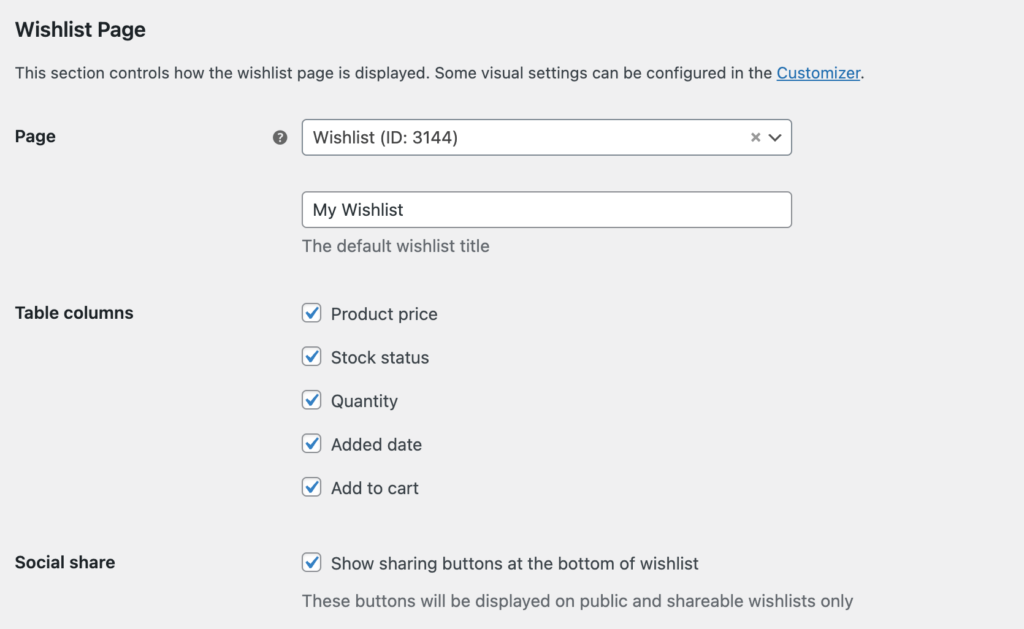
For further customizations, you can find appearance-related settings in Appearance > Customize > WooCommerce > Wishlist Page.
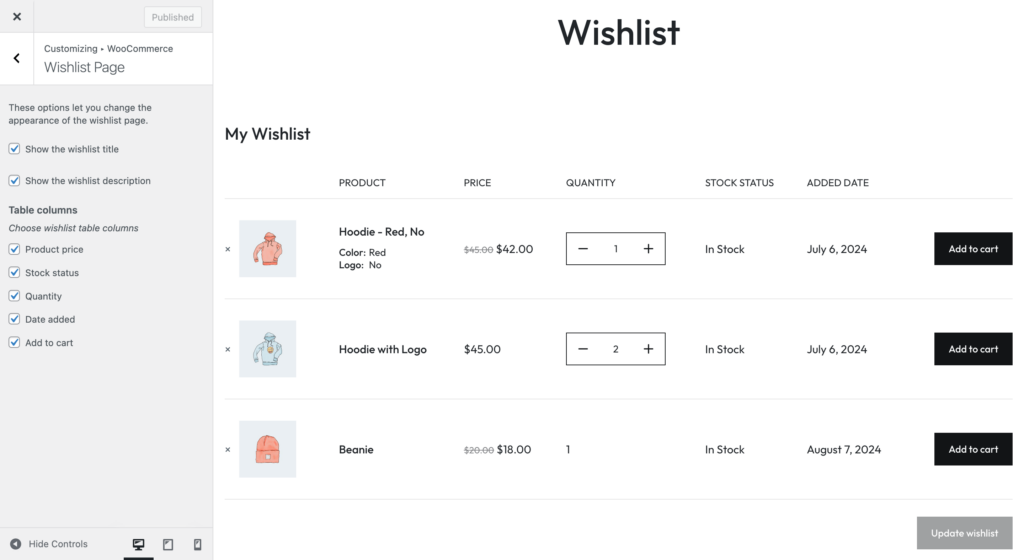
Here you select to show the wishlist title, description, select which columns to display on the Wishlist (similar to WooCommerce Settings).