
Product comparison is a crucial feature to enhance your WooCommerce store’s functionality. It allows customers to easily view and compare the features, prices, and specifications of multiple products side by side. This functionality helps customers make informed decisions quickly, leading to increased customer satisfaction and potentially higher conversion rates.
In this tutorial, we’ll walk you through the process of adding the product compare feature to your WooCommerce store with a plugin.
Table of Contents
Why Your WooCommerce Store Needs a Product Compare Feature
While WooCommerce is a powerful e-commerce platform, it doesn’t come with a built-in product comparison tool. Adding this feature can give your store a competitive edge by:
- Improving user experience.
- Reducing decision-making time for customers.
- Potentially increasing average order value.
- Decreasing cart abandonment rates.
Choosing the Right Product Compare Plugin
Factors to Consider When Choosing a Product Compare Plugin
When selecting a product compare plugin for your WooCommerce store, it’s crucial to consider several factors to ensure you choose the best fit for your needs. Here are the key aspects to keep in mind:
- Ease of use and setup: Look for a plugin that’s intuitive and doesn’t require extensive technical knowledge to set up and manage.
- Compatibility with your theme: Ensure the plugin works well with your current WordPress theme and other installed plugins.
- Customization options: The ability to tailor the compare feature to your store’s look and feel is important.
- Features offered: Consider what specific functionalities you need. Make a list of must-have features before choosing.
- Regular updates and support: Choose a plugin that’s actively maintained and updated. Good customer support is also crucial in case you encounter any issues.
- User reviews and ratings: Check what other users are saying about the plugin. Their experiences can provide valuable insights into the plugin’s pros and cons.
Top WooCommerce Product Compare Plugins
Now that you know what to look for, let’s explore some of the popular product compare plugins available, and select the best one fits your needs. Here are some top options to consider:
For the purpose of this tutorial, we’ll be using WCBoost – Products Compare to demonstrate how to add and configure a product comparison feature. This plugin offers a good balance of functionality and ease of use, making it an excellent choice for most WooCommerce stores.
Step-by-Step Guide to Adding Product Compare Feature
Now that we’ve chosen WCBoost – Products Compare for this tutorial, let’s walk through the process of adding a product compare feature to your WooCommerce store.
But before we dive into the process, make sure your WordPress website has WooCommerce installed and activated.
Step 1: Install and Activate the Plugin
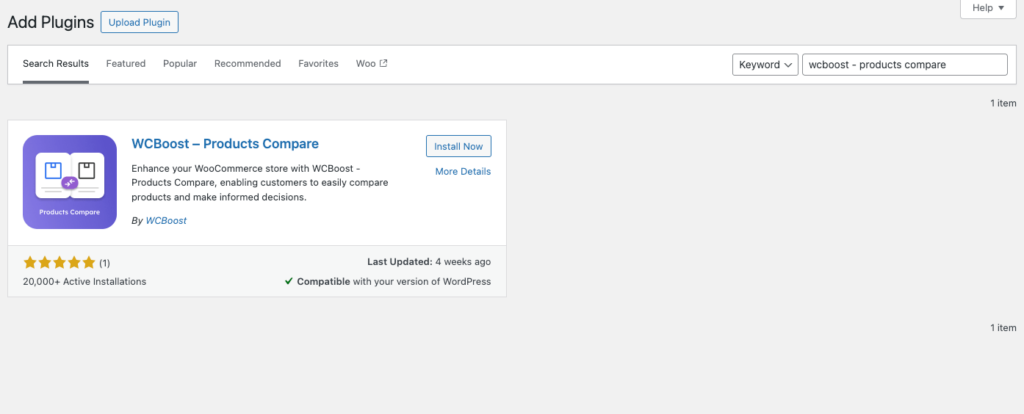
- Log in to your WordPress dashboard.
- Navigate to “Plugins > Add New“.
- In the search bar, type “WCBoost – Products Compare”.
- Click “Install Now” and then “Activate“.
After activation, the basic comparison functionalities are immediately available on your store. Customers can start comparing products right away. However, you’ll likely want to customize the feature to better match your store’s design and specific needs. The following steps will guide you through this customization process.
Step 2: Customize the Compare Buttons
After installing the plugin, you may want to customize the compare buttons to match your store’s design and functionality.
Customizing the button appearance
The appearance of your compare buttons can impact user engagement. To customize the appearance of compare buttons, you can find plugin settings in Appearance > Customize > WooCommerce > Products Compare.
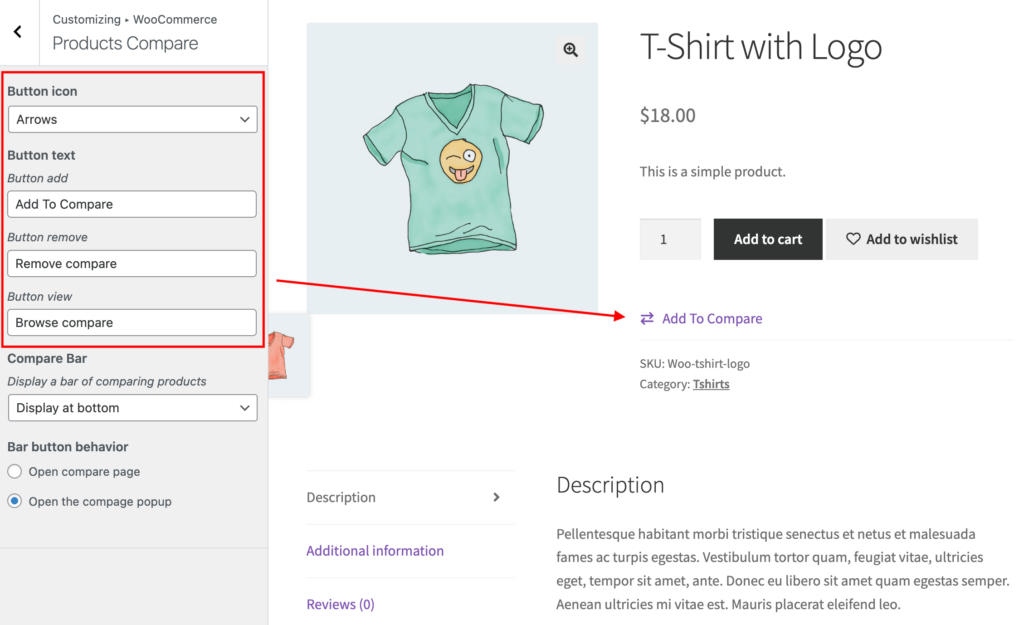
Here you can:
- Choose a predefined icon for the compare button.
- Customize the button text for different states.
- Select to display the icon only, text only, or both.
Changing the button behavior for products already in the compare list
This setting determines what happens when a customer clicks the compare button for a product that’s already in their comparison list. Choosing the right behavior can help streamline the comparison process and improve user experience.
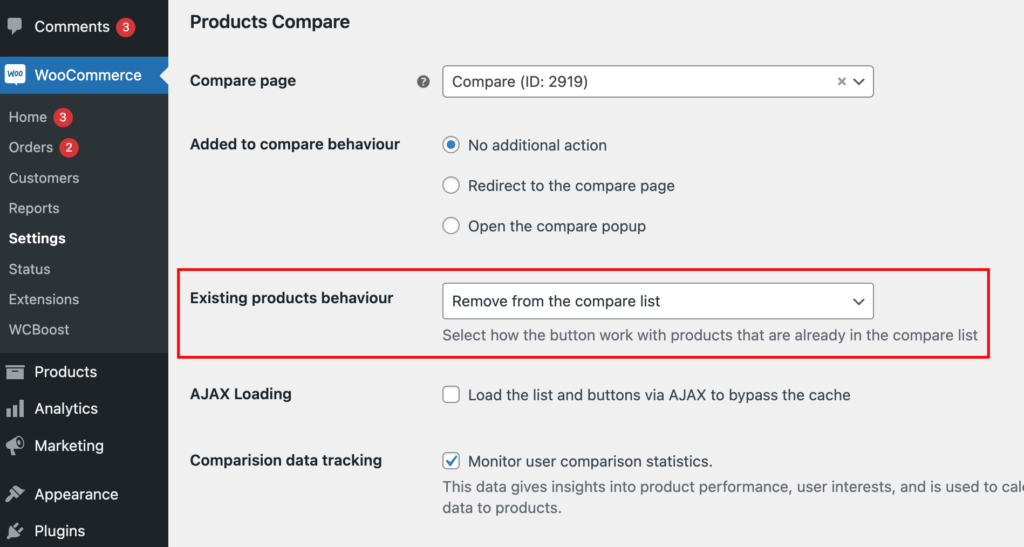
- Go to WooCommerce > Settings > Products and scroll down to the Products Compare section.
- Find the “Existing products behavior” setting. Choose from the following options:
- Remove from the compare list: Clicking the button removes the product from comparison.
- View the compare page: Redirects the user to the comparison page.
- Open the compare popup: Displays the comparison list in a popup.
- Hide the button: The compare button disappears for products already in the list.
Setting an additional action after adding a product to the compare list
This feature allows you to guide customer actions immediately after they add a product to their comparison list. The right setting can help customers navigate more efficiently through your store and make quicker purchasing decisions.
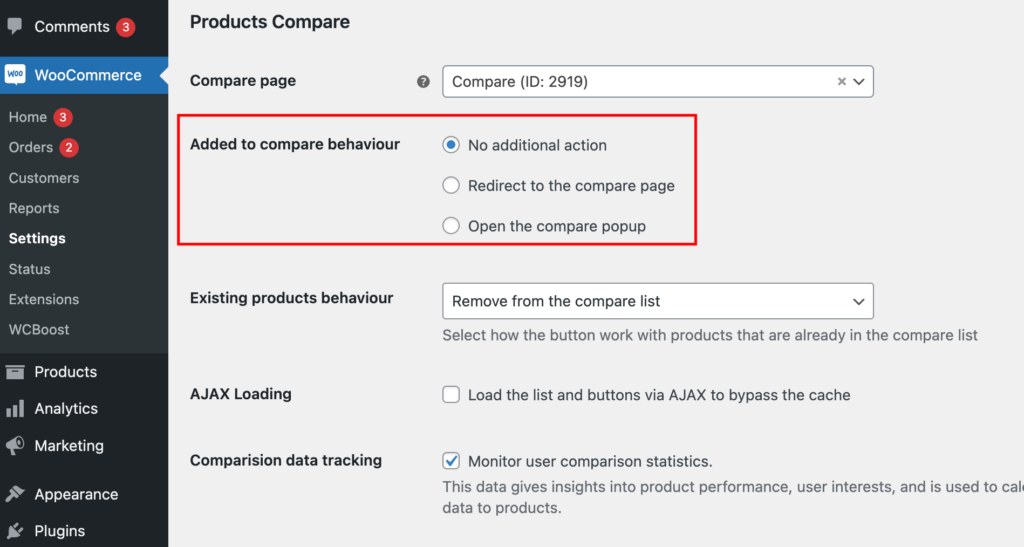
In the same Products Compare section (WooCommerce > Settings > Products), look for the “Added to compare behavior” setting. Select from these options:
- No additional action: The customer stays on the current page.
- Redirect to the compare page: Takes the customer directly to the comparison page.
- Open the compare popup: Displays the comparison list in a popup.
When customizing these aspects, consider your store’s overall design and the user experience you want to create. Clear, intuitive buttons and behaviors can encourage more customers to use the compare feature effectively. Remember to test different configurations to find what works best for your unique store and customer base.
Step 3: Manage and Customize the Comparison Table
The comparison table is where your customers will actually compare products. it can be displayed in two main areas: on the dedicated Compare page and within the Compare popup. Both of these display options use the same customizable table structure, ensuring a consistent experience for your customers.
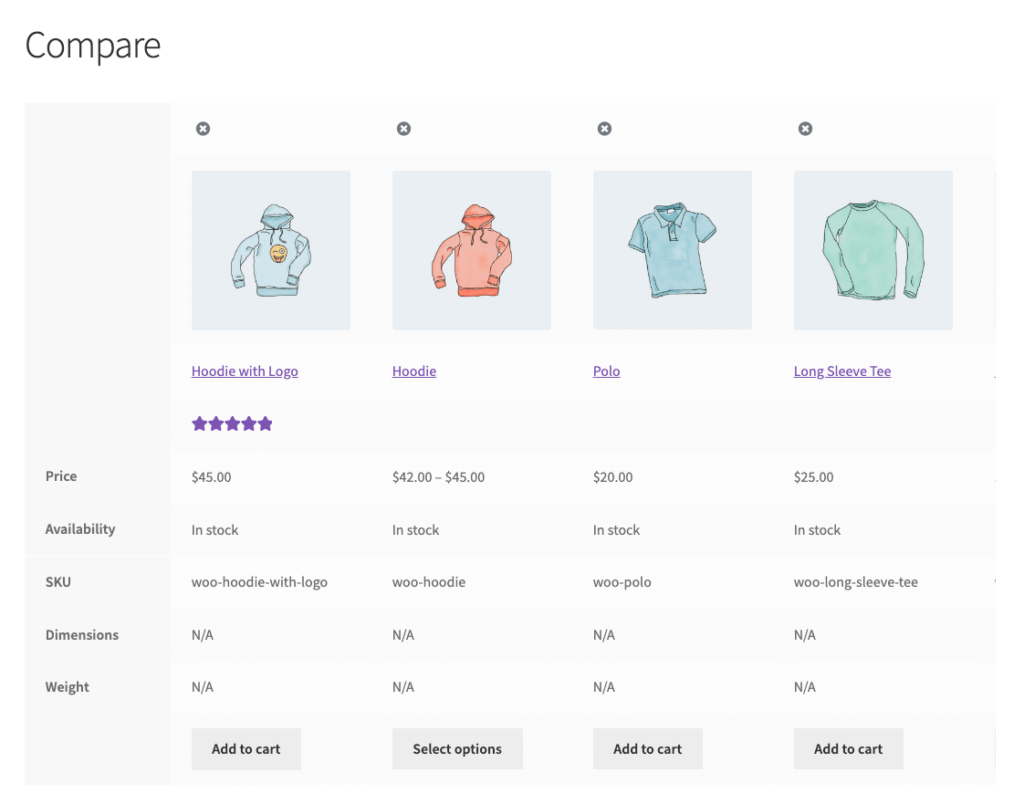
To customize the comparison table and tailor it to your store’s needs, you’ll need to edit the Compare page. This page is automatically created when you install the plugin, but you have full control over its content and layout. Here’s how to customize it:
- Edit your Compare page and you will see the
[wcboost_compare]shortcode in the page content. - Modify the shortcode to customize the fields displayed:
[wcboost_compare fields="field1,field2,field3"] - You can include various fields such as:
– rating: Shows product ratings.
– price: Displays product prices.
– stock: Indicates stock status.
– sku: Shows the product SKU.
– dimensions: Displays product dimensions.
– weight: Shows product weight.
– add-to-cart: Adds an ‘Add to Cart’ button in the comparison table. - To include product attributes, use the prefix “attribute:” before the attribute slug. For example:
[wcboost_compare fields="rating, price, attribute:color, attribute:size, add-to-cart"]When deciding which fields to include, think about what information is most important for your customers when comparing products. Including too many fields can be overwhelming, while too few might not provide enough information for a decision. The goal is to create a comparison table that highlights the key features of your products, making it easy for customers to see the differences and make their choice.
By following these steps, you’ll have successfully added and configured the product compare feature using WCBoost – Products Compare. Remember to test the functionality on your site to ensure everything works as expected.
Conclusion
Adding a product compare feature to your WooCommerce store can significantly enhance the shopping experience for your customers. By following this guide, you can implement this functionality and potentially see improvements in user engagement and sales.
While this guide covers the essential setup and customization options, the WCBoost – Products Compare plugin offers even more advanced features and customization possibilities. For a deeper dive into the plugin’s capabilities, we encourage you to explore the official plugin documentation of the plugin WCBoost – Products Compare. There, you’ll find detailed information on advanced shortcode usage, CSS customization tips, and other powerful features that can help you tailor the product comparison functionality to your store’s unique needs.