WooCommerce is a popular e-commerce platform for online stores. It offers many features to help sell products, including product variations. These variations let customers choose specific options for a product. Variation swatches for WooCommerce are a way to show these options visually.
This guide will explain what variation swatches are, why they’re useful, and how to add them to your WooCommerce store.
Table of Contents
What Are Variation Swatches for WooCommerce?
Variation swatches for WooCommerce are visual elements that replace dropdown menus for product options. Instead of selecting from a list, customers can see and click on colors, images, or buttons. This makes it easier and faster for customers to choose product variations.
For example, instead of a dropdown menu for t-shirt colors, variation swatches would show actual color squares. Customers can then click on the color they want.
Benefits of Using Variation Swatches in WooCommerce
Using variation swatches for WooCommerce has several advantages, for both store owners and customers.
- Better User Experience: Customers can see options quickly without extra clicks. This makes shopping easier and faster. For example, instead of scrolling through a long list of colors, customers can see all color options at once as swatches.
- Higher Sales: Clear options can lead to more purchases. When customers can easily understand and choose product variations, they’re more likely to buy. This is because they feel more confident about their choices and are less likely to abandon their cart due to confusion.
- Improved Look: Product pages look more professional with swatches. Instead of plain dropdown menus, you have colorful and interactive elements on your page. This can make your store appear more modern and user-friendly.
- Mobile-Friendly: Swatches are easy to use on smartphones and tablets. They’re much easier to tap than small dropdown menus on a touch screen. This is important because more and more people shop on their mobile devices nowadays.
Types of Variation Swatches
There are several types of variation swatches you can use in your WooCommerce store:
- Color Swatches: Show color options as colored squares or circles.
- Image Swatches: Display small pictures for options with patterns or designs.
- Label/Text Swatches: Use words to describe options, good for sizes or materials.
- Button Swatches: Clickable buttons that can include text, colors, sizes, or lengths.
How to Add Variation Swatches to Products
To add variation swatches for WooCommerce, you can use a plugin. There are several plugins available, including free and pro versions. This guide will use the WCBoost – Variation Swatches plugin.
The WCBoost – Variation Swatches plugin offers both a Free and a Pro version. Both versions provide a user-friendly and feature-rich solution for implementing swatches in your store. It helps you to start with basic features and upgrade later for more advanced functionality as your needs grow.
Here’s how to use the WCBoost – Variation Swatches plugin on your WooCommerce store:
Step 1: Install the WCBoost – Variation Swatches Plugin
You can find and download the plugin WCBoost – Variation Swatches on the WordPress website. Or you can install it directly from your website’s dashboard.
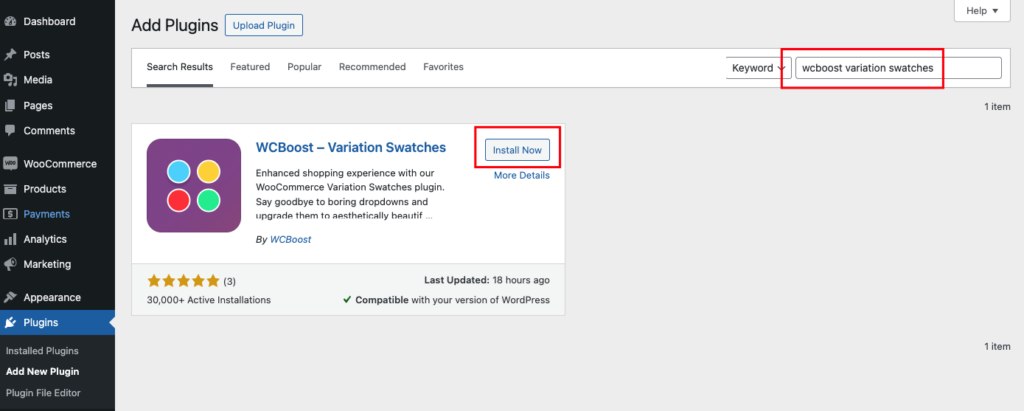
Here’s how to install it:
- Log in to your WordPress dashboard and navigate to Plugins > Add New.
- Search for “WCBoost – Variation Swatches” in the plugin search box.
- Click Install Now and then Activate to enable the plugin on your website.
For more detailed information about installation and initial setup, you can refer to the official documentation of the plugin.
Step 2: Set Up Global Product Attribute Swatches
By setting up global product attributes, you can apply them to any product in your store. They’re useful for managing common features like Sizes, Colors, or Materials.
You can find and manage these attributes in the WooCommerce menu under Products > Attributes. With each attribute, you can set the swatch type and configure the swatch for associated terms.
To set up swatches for global attributes:
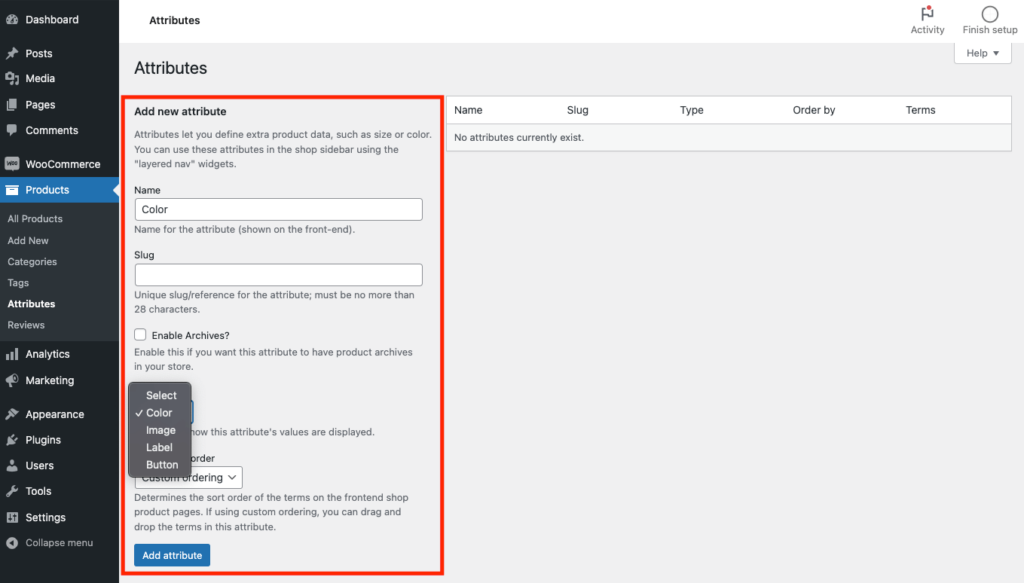
- Go to your WordPress dashboard and navigate to Products > Attributes.
- To create a new attribute, enter a name (e.g., “Color”) and an optional slug in the provided fields.
- Choose a Type for the attribute from the dropdown menu: Select, Color, Image, Label, or Button.
- Click Add attribute to create the new attribute (or Save changes if you are editing an attribute).
After creating or editing an existing attribute, you need to configure swatch for attribute options:

- Click on the “Configure terms” link next to your attribute.
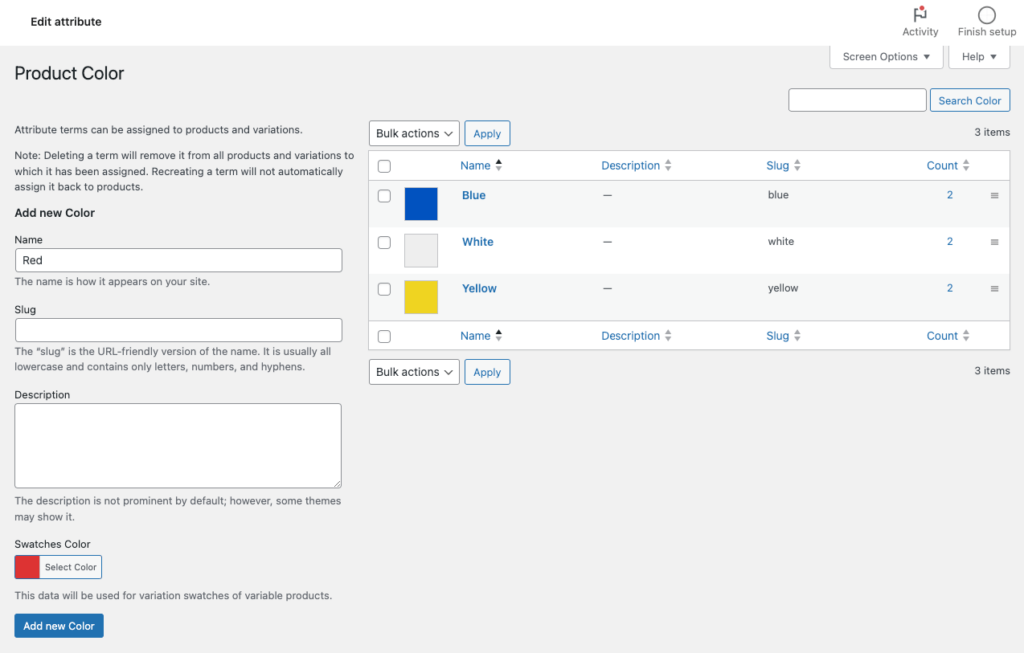
- On the right side, you’ll see a list of existing terms (if any). On the left, there’s a form to add new terms.
- To add a new term:
- Enter the Name (e.g., “Red” for a color attribute)
- (Optional) Enter a Slug, or leave it blank for automatic generation
- Depending on the attribute type, you’ll see different options:
- For Color: Use the color picker to choose a color
- For Image: Upload or select an image from your media library
- For Label: Enter the text to display on the swatch
- For Select or Button: The term’s Name will be used
- Click Add new to save the new term.
- To edit existing terms, click the “Edit” link under each term name and modify as needed.
For more detailed instructions on setting up global attribute swatches, you can refer to the plugin’s documentation.
Step 3: Add Attributes to Products
Once you’ve set up global attributes, you can add them to any product in your WooCommerce store. However, it’s important to note that variation swatches will only be displayed for variable products.
Here’s how to add attributes and set up variations for a variable product:

- Create a new product or edit an existing one, ensuring it’s set as a variable product.
- Scroll down to the Product Data section and select the Attributes tab.
- From the dropdown menu, select the attribute you want to add (e.g., “Color”), then click “Add“.
- In the “Values” field, select attribute terms (options) to add to the product.
- Check the “Used for variations” box for the attribute.
- Click “Save attributes” at the bottom of the section.
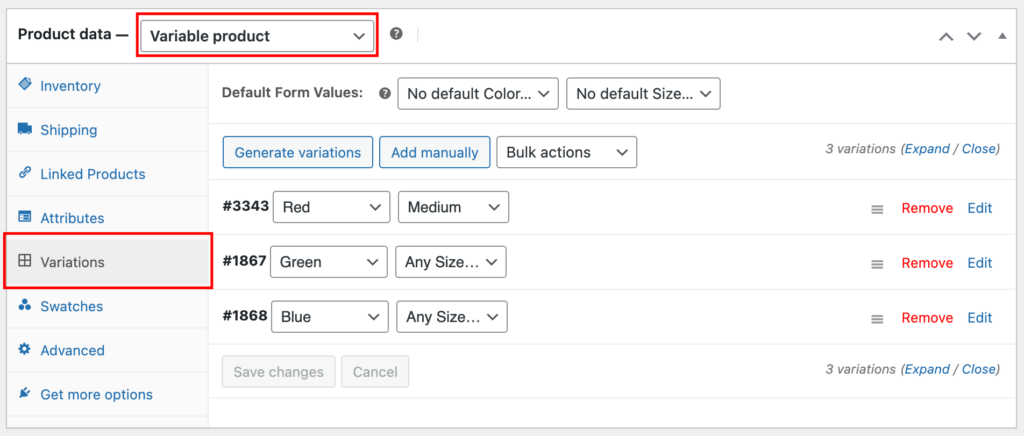
Next, you need to set up the variations:
- Go to the “Variations” tab in the “Product Data” section.
- Select “Create variations from all attributes” from the dropdown and click “Go”.
- WooCommerce will generate all possible combinations of your attributes.
- You can then edit each variation to set prices, stock status, and other details.
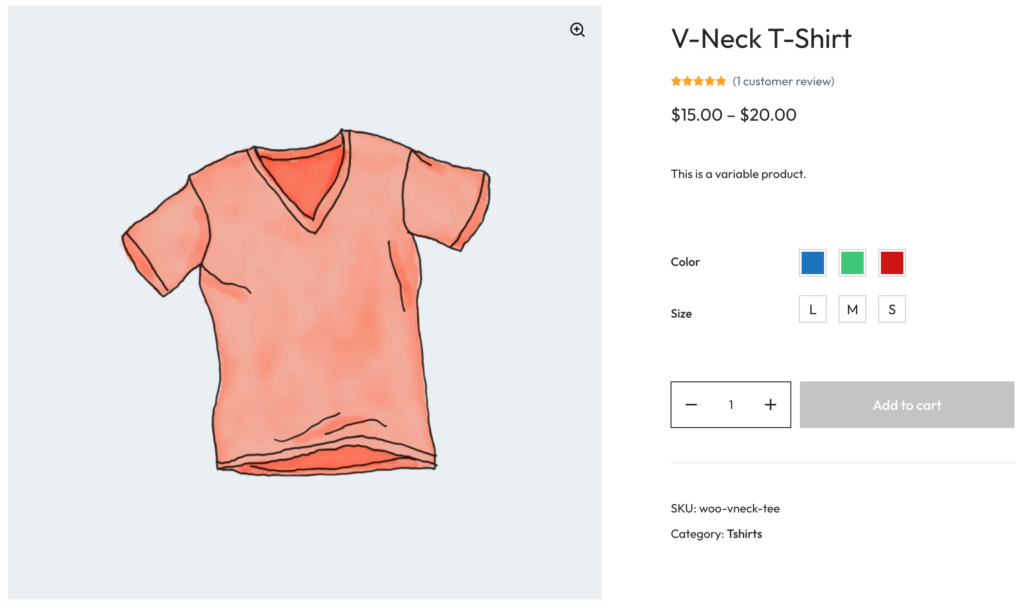
After completing these steps, the variation swatches will automatically display on your product page. For example, if you set the attribute type as “Color”, attribute options will show as color swatches on the product page.
Set Up Swatches for Custom Attributes
In the previous section, we know how to configure global attribute swatches and add them to variable products. This is the most common usage of variation swatches. However, WooCommerce also supports custom attributes. Custom attributes are specific to individual products, unlike global attributes.
The WCBoost – Variation Swatches plugin allows you to set up swatches for these custom attributes as well.
Here’s how you can add custom attributes to a product:
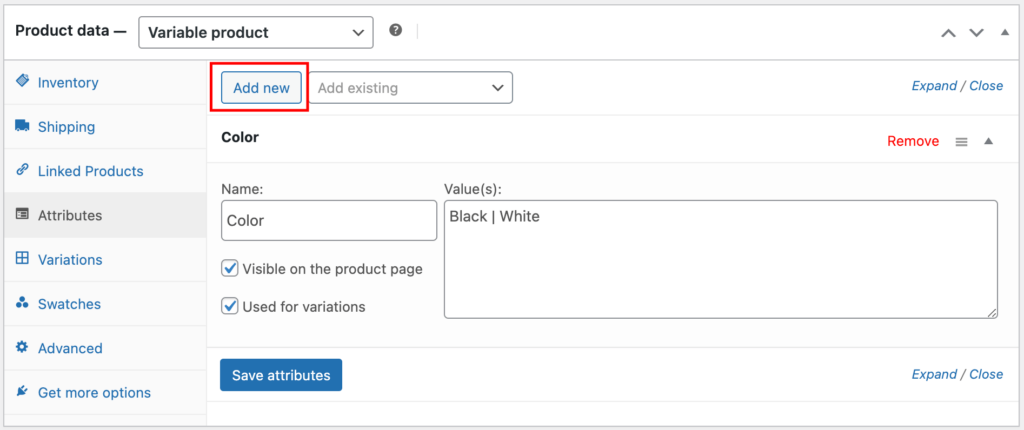
- In the Product Data section, select the Attributes tab.
- Add a custom attribute by clicking the Add New button. Enter the attribute name and values for it. Each option must be separated by the “|” character. Remember to check the “Used for variation” box if you would like to display variation swatches for this custom attribute.
- After adding the custom attribute and its values, click the Save Attributes button to update them to the product.
Once you have added custom attributes, you can set up variations with them. Open the Variations tab to set product variations.
Now you can set up swatches for custom attributes in the Swatches tab.
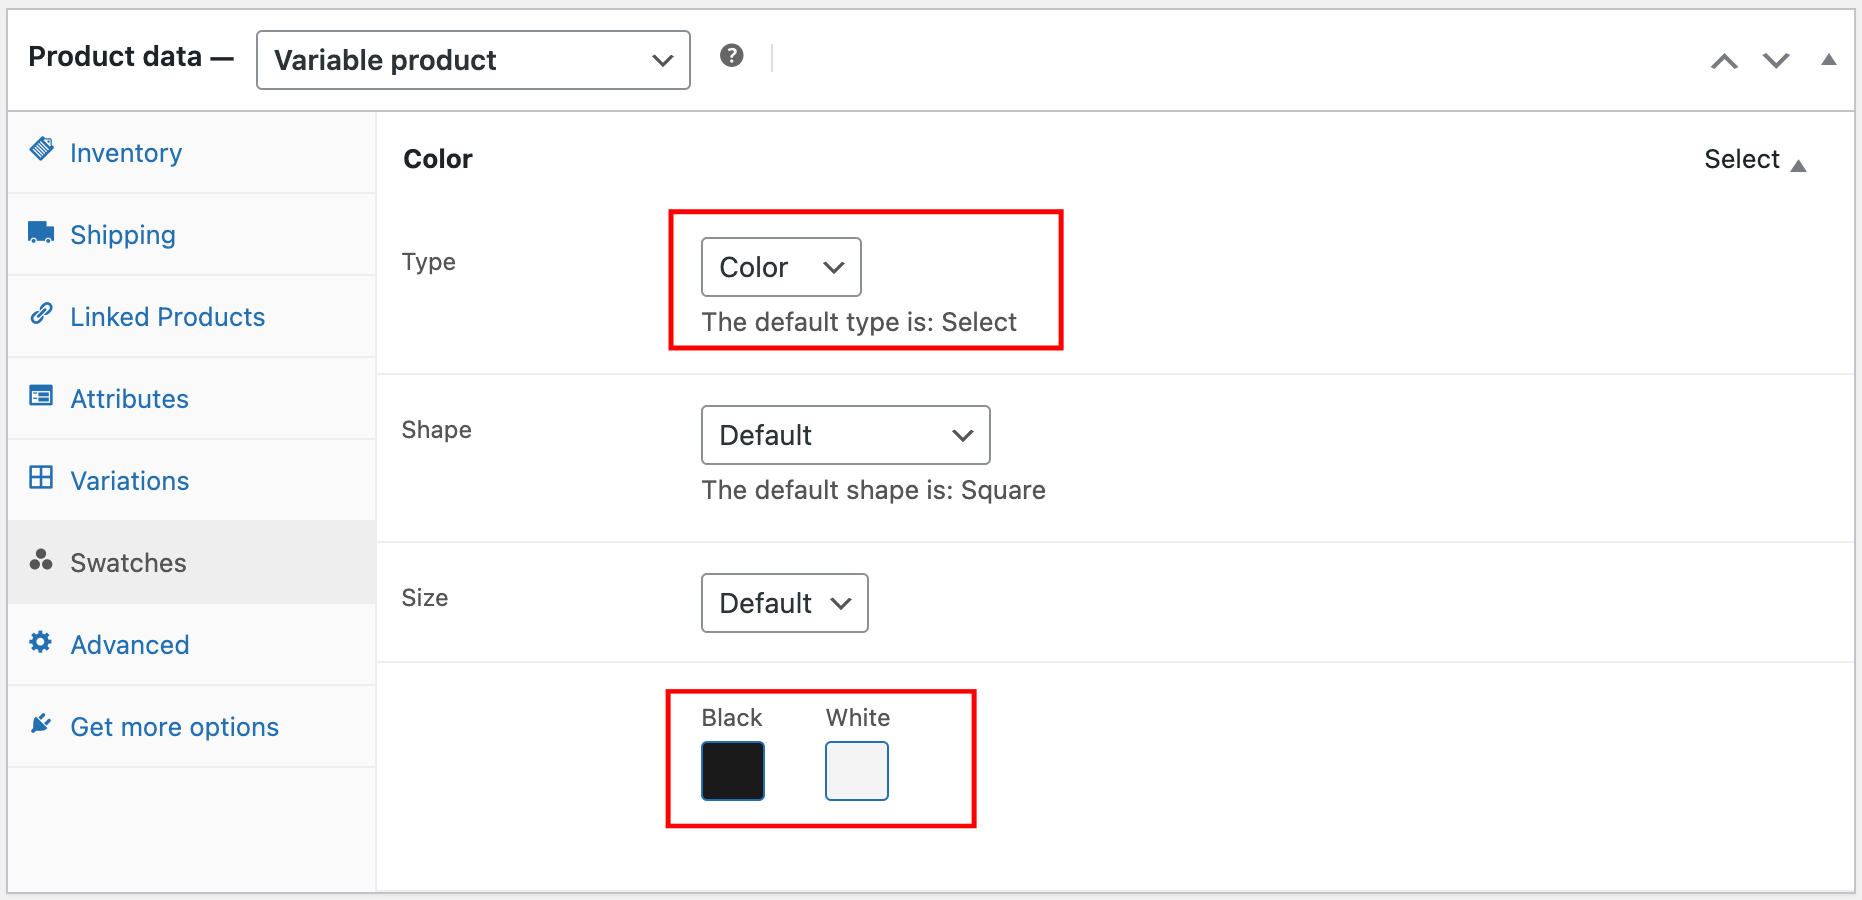
- Open the Swatches tab in the Product Data section.
- Here, you’ll see a list of all attributes for this product, including custom ones.
- For each attribute, you can:
- Change the default attribute Type (which is initially set to “Select” for custom attributes). Choose from options like Color, Image, Label, Button, or keep the default type.
- Change the shape and size of attribute swatches.
- Configure swatch values (such as color, image, or label text) depending on the chosen swatch type.
- Depending on the chosen type, you will see options to pick the color, upload a swatch image, or set the label for every attribute option.
- Click the Update button to save all changes.
Custom attribute swatches offer unique benefits. They let you create visually appealing options for products with unique attributes.
Furthermore, you can use this method for global attributes too. You can also use it to adjust global attribute swatches for specific products. For example, you could change a global Color attribute to display as Image swatches on a particular product page. This flexibility allows you to customize the appearance of variation swatches for individual products when needed.
Addition Options for Variation Swatches
The WCBoost – Variation Swatches plugin offers all you need to customize the appearance and behavior of variation swatches on your WooCommerce store. You can change the shape and size of swatches, enable the tooltip, show the selected product attribute options, etc. To learn more about what this plugin offers, you can refer to the online documentation of the WCBoost – Variation Swatches plugin.

Adjust Swatch Sizes and Shapes
In the plugin settings, you can modify the size and shape of your swatches.
- Go to Appearance > Customize > WooCommerce > Variation Swatches from the admin dashboard.
- Change the shape of variation swatches with the setting “Swatches Shape“.
- Change the swatch size with the setting “Swatches Size” by entering the width and height.
- Save your changes and check how they look on your product pages.
Add Tooltips and Show Label of Selected Attributes
You can enable tooltips to display additional information when a customer hovers over a swatch. Additionally, the plugin allows you to show the label of the selected attribute alongside the swatch, providing clarity for your customers.
- In the Customize settings, turn on the setting “Enable Tooltip“.
- Enable setting “Show the selected attribute’s label” to display which option is selected.
Conclusion
Variation swatches for WooCommerce are a powerful tool to improve your online store. They make it easier for customers to choose product options, which can lead to more sales. By following this guide, you can add and customize variation swatches for your WooCommerce store.
By implementing variation swatches for WooCommerce, you’re taking a big step towards a better shopping experience for your customers. This can lead to happier customers and a more successful online store.